Alright! Here we go! Another Fashion Friday. Can I get a woot woot!!
First of all – these are my absolute summer staples. I think I’ve worn these yellow shoes (bought them last summer) and these earrings (Forever 21) at least 3-4 times each week. They just go with everything – dressy or casual – and they seem to call out SUMMER. Love them.
Here’s a random picture in a not so amazing outfit, but I’m once again wearing the shoes and earrings. These shorts are also a summer staple of mine and have been for the last few years. I need to update them, but they are True Religion and the most I have ever spent on any one article of clothing (if Kenny only knew! He’d die!) so I definitely wanted to get my money out of them! And I think I have.
And it’s about time to retire them. But I have loved these shorts.
Here’s my favorite fashion accessory lately. My cute friend Amy bought me this key chain for my last birthday (ordered from an etsy shop) and I have been so in love with it. First, I love the color. I’m always wearing this color – it’s a favorite. Second, this key chain makes it so easy to find my keys in my purse. Can’t miss them with this on! Third, it has come in so handy to have my keys on my wrist because I’m always holding Kole. I keep them on getting him in and out of the car and I always have my keys with me. Genius! Thanks again Amy!
Speaking of my favorite clothing color, here is a new dress I just bought from the Limited.
It’s simple. I like simple. Notice we are all three sporting our yellow sandals. Fabulous.
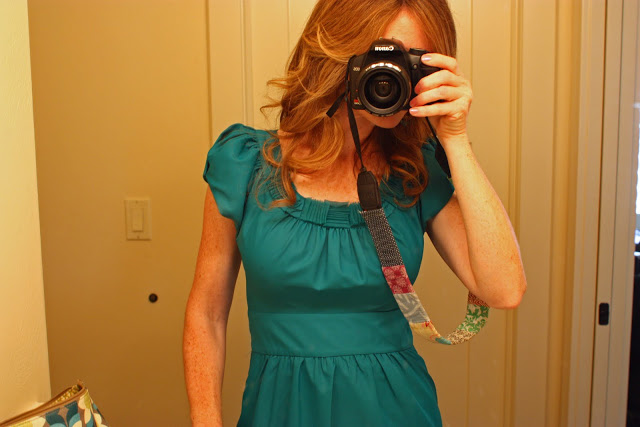
I also really like the ruffles and gathers at the top. What I don’t like is the lighting in this bathroom.
Found this cream top for Fall while I was in Utah last week. My sister-in-law saw it and said “oh that is so you!” And she is so right. I probably own 10 other tops just like this. I LOVE cream in the fall.
But wait — it’s missing something…
my
Anthro belt please! Add some skinny jeans and Fall boots and this is perfect.
An Erin outfit for sure.
Bought this fun sweater at Down East. It’s cropped so I’ll probably wear it with a white tank under it. It was only 30 bucks! And I was so excited! But also ashamed…
since it is SO similar to this yellow sweater I bought from Anthropologie for our family pictures that was NOT only 30 bucks. I need to do the Down East thing a little more and the Anthro thing a little less. :)
Here’s my favorite thing I’ve bought lately. I’m so in love with this skirt! I’m sure you can’t guess why…um…it’s cream….and it has a belt. I’m nothing if not predictable.
And here I am modeling the skirt – only because several of you requested that I do so. The skirt is from a store called Urban Wear in sunny St. George, UT and the shirt is from Forever 21. The shoes are Guess and I’ve had them for years and I can’t live without them.
Another favorite thing about this skirt is the pockets. Because well. Pockets on skirts are just cool.
Grabbed my girl to pose with me. She was running around on the rocks at the time of this mini photo shoot.
And last but certainly not least, a new outfit I picked up for the main squeeze in my life.
I fell in love with these shorts…
and this shirt….(Gymboree)
and these tiny adidas shoes.
Who said buying clothes for boys isn’t as fun!!?
I’ll have to take a picture of my little dude in his new outfit.
I’m sure he’ll be SO cooperative to model it for me.
BTW – Did you all watch the season finale of
SYTYCD? It was SO GOOD! I cried at the end!!! Kenny and I had the winner picked from day one. She was amazing. We’ve also bought our tickets to the live show and picked up two extra tickets to take friends.
Can I get a woot woot!!
Happy Friday everyone!
:)
xoxo, Erin


